BIOS 删除空白启动(多于启动项)
显示当前启动信息
1
2
3
4
5
6
7
8
9
user@host 1 17:27 >/usr/sbin/efibootmgr -v
BootCurrent: 0000
Timeout: 1 seconds
BootOrder: 0000,0003,0004,0006,0007
Boot0000* opensuse HD(1,GPT,xxxx-x-xxx-aaa,0x800,0x327cc)/File(\EFI\OPENSUSE\GRUBX64.EFI)
Boot0003* debian HD(1,GPT,xxxx-x-xxx,0x800,0x100000)/File(\EFI\DEBIAN\SHIMX64.EFI)
Boot0004* Windows Boot Manager HD(1,GPT,xxxx-x-xxx-bbb,0x1000,0x96000)/File(\EFI\MICROSOFT\BOOT\BOOTMGFW.EFI)..BO
Boot0006* UEFI: SanDisk, Partition 2 PciRoot(0x0)/Pci(0x1,0x2)/Pci(0x0,0x0)/USB(2,0)/HD(2,MBR,0x61f4c181,0x7280000,0x10000)..BO
Boot0007* debian HD(1,GPT,xxxx-x-xxx,0x800,0x100000)/File(\EFI\DEBIAN\GRUBX64.EFI)..BO删除指定的启动信息
1
2
3
4
5
6
7
8
9
user@host 3 17:27 >sudo /usr/sbin/efibootmgr -b 0007 -B
[sudo] root 的密码:
BootCurrent: 0000
Timeout: 1 seconds
BootOrder: 0000,0003,0004,0006
Boot0000* opensuse
Boot0003* debian
Boot0004* Windows Boot Manager
Boot0006* UEFI: SanDisk, Partition 2重新打印删除后的启动信息
1
2
3
4
5
6
7
8
9
user@host 4 17:27 >/usr/sbin/efibootmgr -v
BootCurrent: 0000
Timeout: 1 seconds
BootOrder: 0000,0003,0004,0006
Boot0000* opensuse HD(1,GPT,xxxx-x-xxx-aaa,0x800,0x327cc)/File(\EFI\OPENSUSE\GRUBX64.EFI)
Boot0003* debian HD(1,GPT,xxxx-x-xxx,0x800,0x100000)/File(\EFI\DEBIAN\SHIMX64.EFI)
Boot0004* Windows Boot Manager HD(1,GPT,xxxx-x-xxx-bbb,0x1000,0x96000)/File(\EFI\MICROSOFT\BOOT\BOOTMGFW.EFI)..BO
Boot0006* UEFI: SanDisk, Partition 2 PciRoot(0x0)/Pci(0x1,0x2)/Pci(0x0,0x0)/USB(2,0)/HD(2,MBR,0x61f4c181,0x7280000,0x10000)..BO
添加当前用户sudo权限
Debian 11
root登陆
1 | /usr/sbin/usermod -aG root userName |
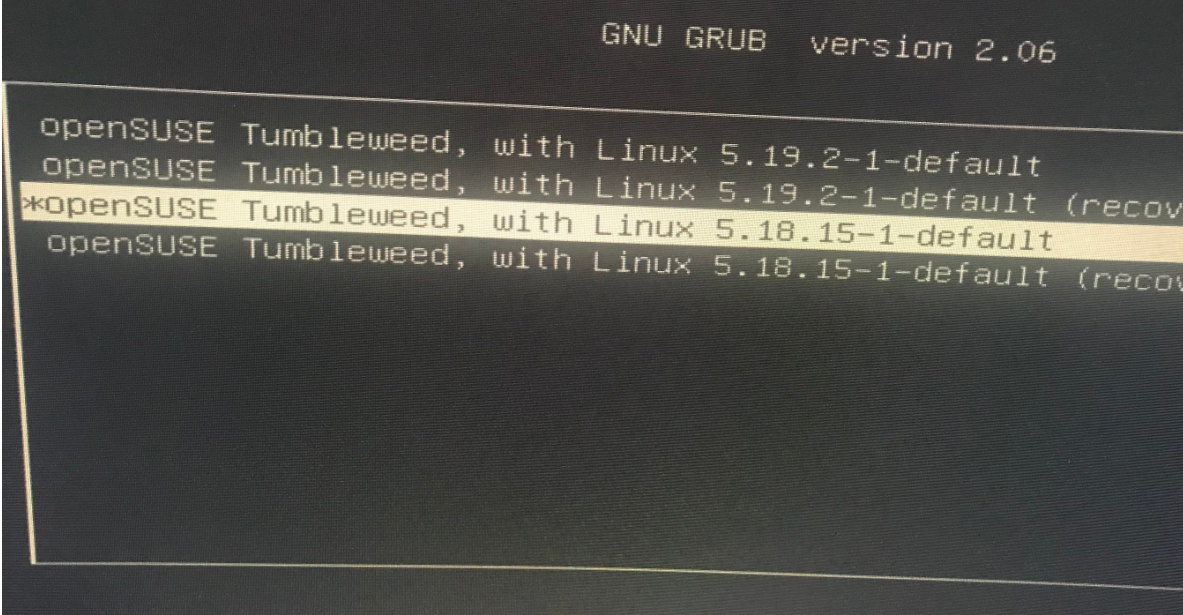
修改内核启动项
openSUSE
默认启动项索引数字是0
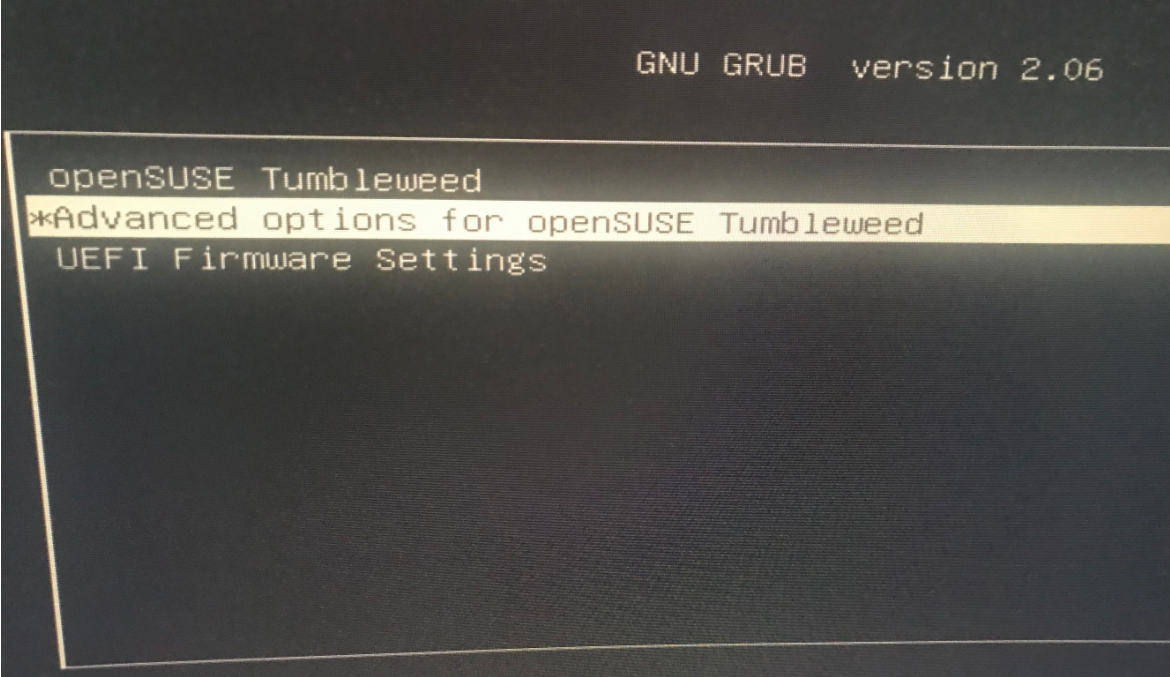
1是系统启动界面的第二个选项通常是高级选项2是进入高级选项之后要启动的第三个内核 这里的顺序从0开始计算
vim /etc/default/grub
GRUB_DEFAULT=”1>2”
1 | # Uncomment to set your own custom distributor. If you leave it unset or empty, the default |
生成配置文件(这里不需要install)
1 | grub2-mkconfig -o /boot/grub2/grub.cfg |
列出默认启动
grub2-editenv list1
saved_entry=openSUSE Tumbleweed
socks52http
user@host:~$ sudo apt install privoxy
配置ss代理端口
1
2
user@host:~$ grep socks5 -nr /etc/privoxy/config
forward-socks5t / 127.0.0.1:1080 .重启服务
1
user@host:~$ systemctl restart privoxy.service
终端配置
1
2
user@host:~$ export http_proxy=http://127.0.0.1:8118
user@host:~$ export https_proxy=$http_proxy验证
1
2
3
user@host:~$ curl -I www.google.com
HTTP/1.1 200 OK
Content-Type: text/html; charset=ISO-8859-1
关闭ext4文件系统的日志
liveCD中执行
正在挂载的盘无法关闭
tune2fs -l /dev/sda3 |grep has_journal
1
Filesystem features: has_journal ext_attr resize_inode dir_index filetype extent flex_bg sparse_super large_file huge_file uninit_bg dir_nlink extra_isize
tune2fs -O ^has_journal /dev/sda3
tune2fs -l /dev/sda3 |grep has_journal 这里无输出内容为关闭
e2fsck
- 开机出现内核错误 硬盘突然断电 SSD释放trim之后硬盘无法挂载问题等….
1
2
e2fsck -c -y -v /dev/sda3
restic
[备份恢复工具](https://restic.net/#quickstart)
安装
1
sudo apt install restic
备份root
这里没有备份单独分区的/boot/efi
1 | restic -r /mnt/sdd1/restic-debian/ init |
查看备份
1
sudo restic -r /mnt/sdd1/restic-debian/ snapshots
列出备份详细
1
sudo restic -r /mnt/sdd1/restic-debian/ ls b9bf4ab3
添加tag
为快照b9bf4ab3添加一个名为root的tag
- 添加之前
user@host:~$ sudo restic -r /mnt/sdd1/restic-debian/ snapshots
[sudo] user 的密码:
enter password for repository:
1 | repository d13c80ec opened (repository version 2) successfully, password is correct |
- 添加tag
user@host:~$ sudo restic -r /mnt/sdd1/restic-debian/ tag –add root b9bf4ab3
enter password for repository:
1 | repository d13c80ec opened (repository version 2) successfully, password is correct |
- 查看
user@host:~$ sudo restic -r /mnt/sdd1/restic-debian/ snapshots
enter password for repository:
wrong password or no key found. Try again
enter password for repository:
1 | repository d13c80ec opened (repository version 2) successfully, password is correct |
单独备份home
1 | user@host:~$ sudo restic -r /mnt/sdd1/restic-debian/ backup --tag home-none /home/ --exclude={"/home/user/.android/*","/home/user/.cache/*","/home/user/.config/Slack/Cache/*","/home/user/.config/Slack/Service\ Worker/CacheStorage/*","/home/user/.config/Code/Cache/*","/home/user/.dartServer/*","/home/user/.gradle/*","/home/user/.local/share/TelegramDesktop/tdata/user_data/cache/*","/home/user/Blog/.deploy_git","/home/user/Android/*","/home/user/flutter/*","/home/user/.pub-cache/*","/home/user/.npm/*","/home/user/Download/*","/home/user/go/pkg/mod/*","/home/user/android-studio/*","/home/user/Sync/other/*","/home/user/Sync/zysj/*"."/home/user/nfs_share/*"} -v |
1 | repository d13c80ec opened (repository version 2) successfully, password is correct |
- 查看
user@host:~$ sudo restic -r /mnt/sdd1/restic-debian/ snapshots
enter password for repository:
1 | repository d13c80ec opened (repository version 2) successfully, password is correct |
check
user@host:~$ sudo restic -r /mnt/sdd1/restic-debian/ check
1 | 74 additional files were found in the repo, which likely contain duplicate data. |
- prune
user@host:~$ sudo restic -r /mnt/sdd1/restic-debian/ prune
enter password for repository:
1 | repository d13c80ec opened (repository version 2) successfully, password is correct |
- check
user@host:~$ sudo restic -r /mnt/sdd1/restic-debian/ check
using temporary cache in /tmp/restic-check-cache-2133091447
enter password for repository:
1 | repository d13c80ec opened (repository version 2) successfully, password is correct |
恢复单个文件
1 | sudo restic -r /mnt/sdd1/restic-debian/ restore b4e97487 --target / --include /home/user/xxx.tar.gz |
使用gpg加密密码文件
- 创建一个保存密码的文件并写入备份密码
- 使用gpg加密这个文件
- 输入gpg密码来备份
1
gpg --decrypt gpg加密的密码文件.gpg | restic -r ......
debug-shell
systemd 系统忘记密码以root登入
1 | systemd.debug-shell=1 #Ctrl + F9 |
40_custom
通过grub2启动iso(clonezilla-live-2.8.1-12-amd64.iso)
查看要启动的iso信息
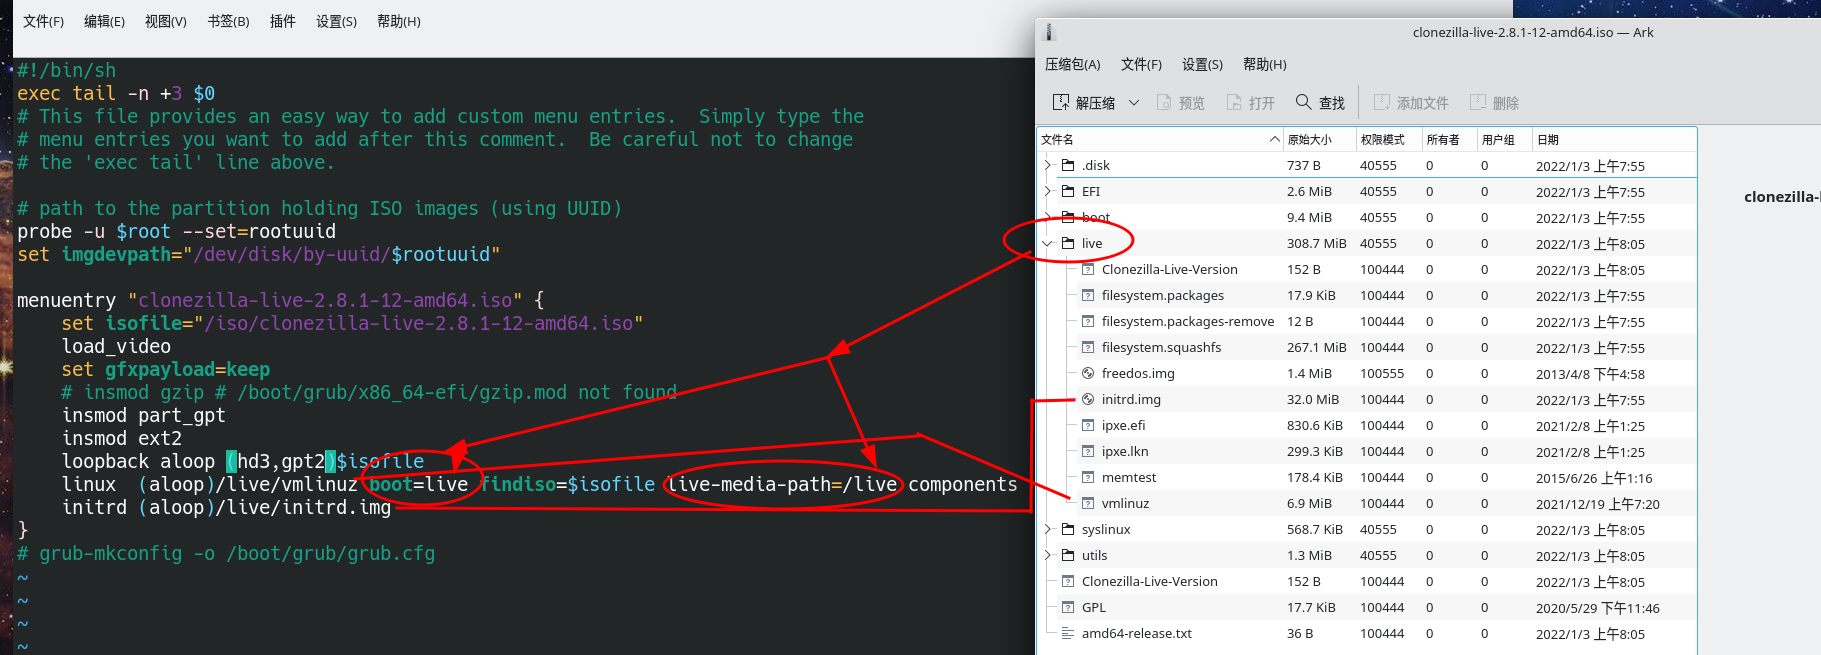
编写配置文件
1 | cd /etc/grub.d/ |
- 40_custom
1 |
|
生成grub配置文件
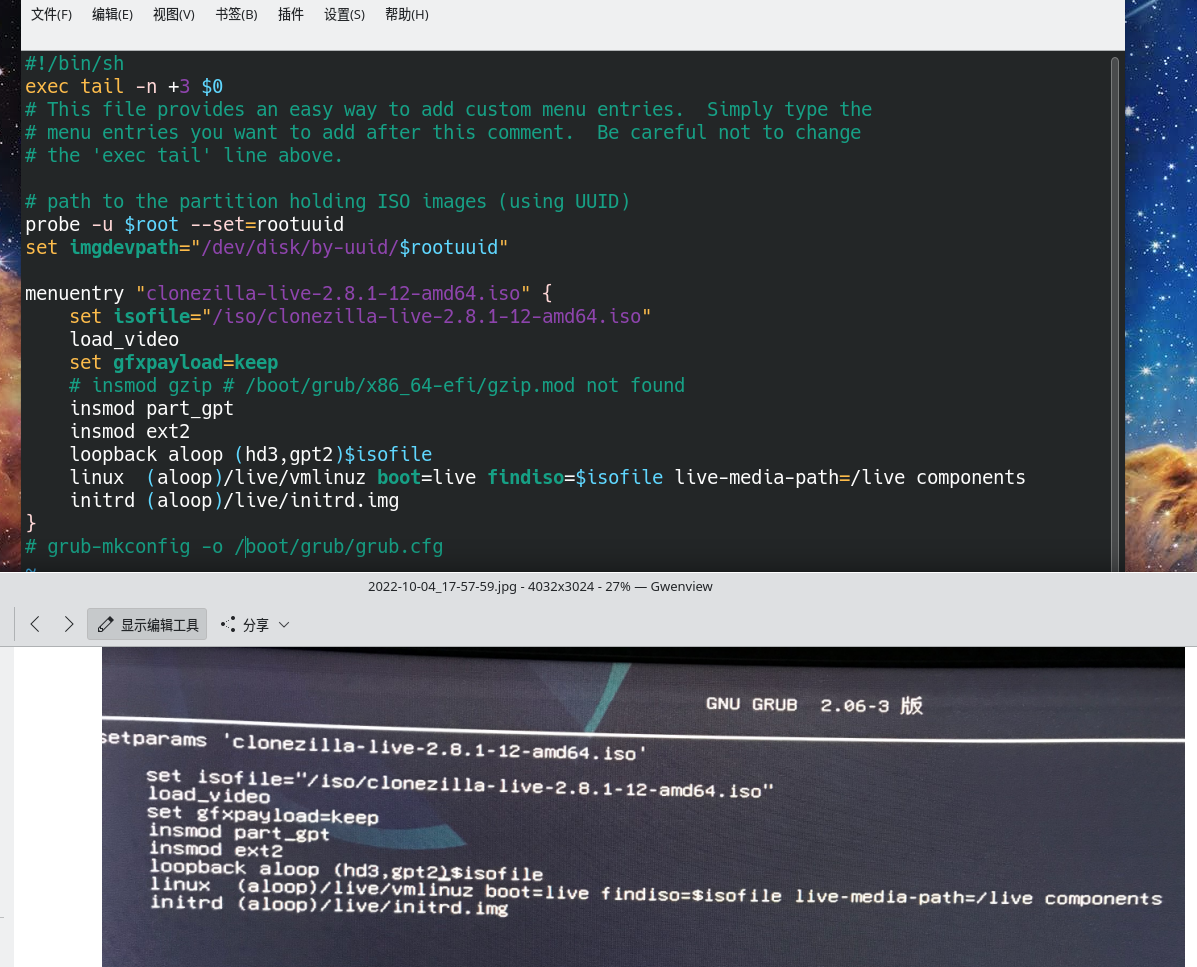
生成grub.cfg后会在grub启动界面看到clonezilla-live-2.8.1-12-amd64.iso1
sudo grub-mkconfig -o /boot/grub/grub.cfg
reboot
设置grub
loopback aloop (hd3,gpt2)$isofile 这里的(hd3,gpt2)是系统重启后对应之前存放clonezilla-live-2.8.1-12-amd64.iso的路径
如果提示iso文件没有找到
- 先列出一个可能的磁盘路径 如果不是就继续 直到(hdx,gptx)/iso/ 列出clonezilla-live-2.8.1-12-amd64.iso
1
ls -l (hd3,gpt1)/
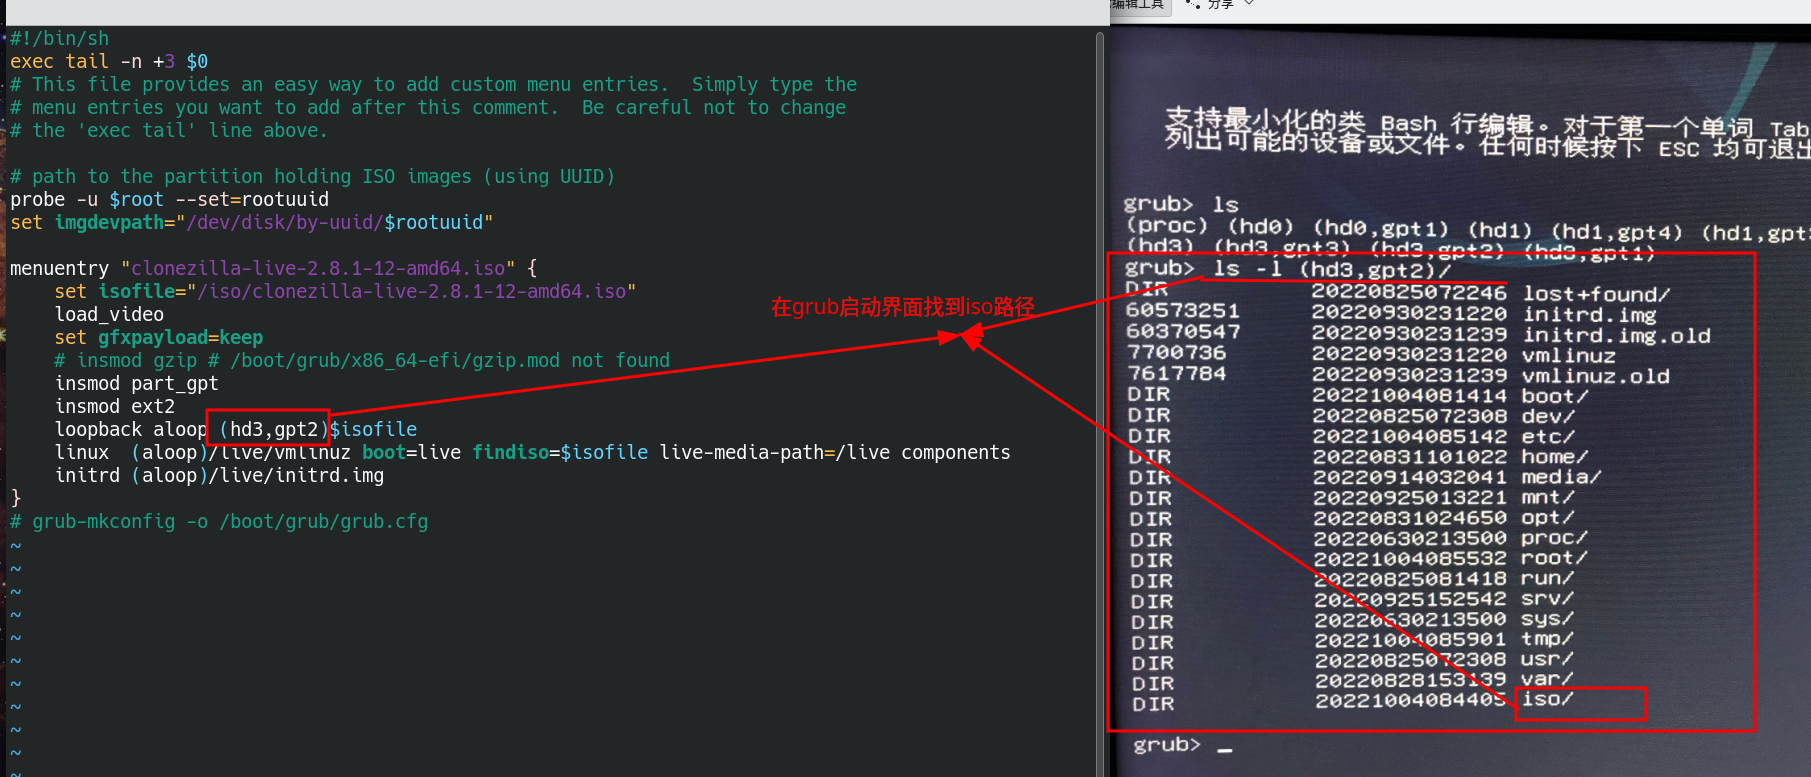
成功启动
openssl
有效期 day=365
Common Name (e.g. server FQDN or YOUR name) []: 这里写网站 www.example.com
1 | openssl genrsa -out server.key 2048 |
Certificate request self-signature ok
subject=C = AU, ST = Some-State, O = Internet Widgits Pty Ltd, CN = www.example.top, emailAddress = abc@example.com